Tuesday, October 20, 2015
Installing HAZARD switch
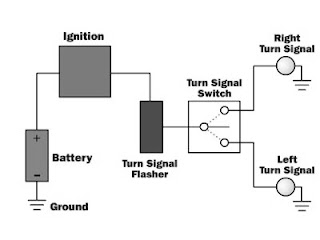
Some bike models especially those commuter bikes often do not have a hazard switch to alert other motorist that you are travelling the road with problem with your bike.Photo shown is the common block diagram of a turn signal wiring, wherein, when turn signal switch is activated, it will blink the turn signal lights left or right depending on the position of the switch. Front and rear signal lights are just parallel on each side.
More often, riders needs and want to install a HAZARD switch so that when activated will flash all signal lights to alert or inform other motorist to take caution on following you, that maybe you have some sorth of problem and or you are on a convoy.
HAZARD switch is so easy to do if you just follow your own bikes wiring diagram, by taking the common block diagram above only four components will be installed to have a hazard signal function.
- normally open push button switch
- 2 pcs of rectifier diode (ex: 1n4002)
- 3 pcs of stranded wire, prefer #18 AWG
- and an electronic flasher like on this link universal led flasher for leds or bulbs
Hazard Switch connection
The turn signal flasher on the block diagram will be replaced by your electronic flasher, aftermarket and or the DIY mentioned, and just follow the add on components, and voila, you have now a hazard function. no need for rewiring your old system.
Subscribe to:
Post Comments (Atom)


No comments:
Post a Comment